 Pin it
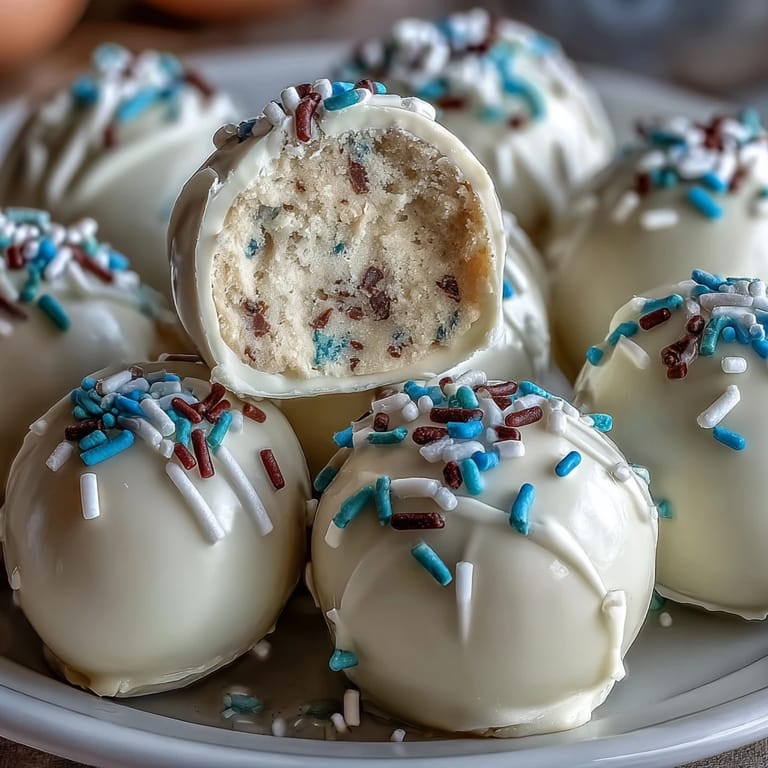
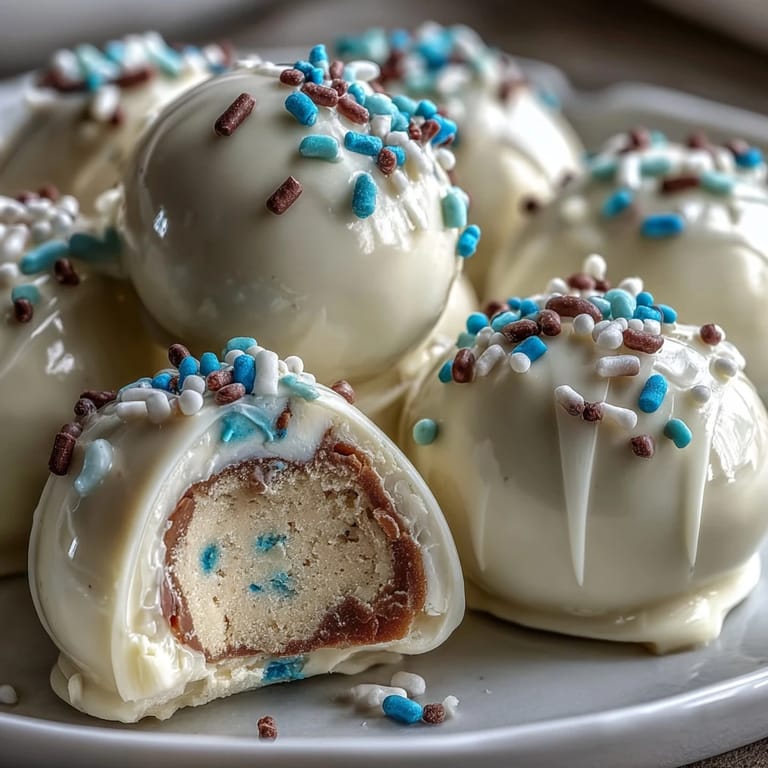
 The aroma of peanut butter and white chocolate swirling together always reminds me of the early spring when I was searching for ways to make our Easter baskets extra memorable. There& was something lighthearted about assembling these treats, watching the sprinkles skitter across the countertop as if they were confetti celebrating their own creation. My first batch came about on a whim, mostly because I wanted something homemade to share with neighbors, and the process turned out to be more joyful than expected. The colors, the creamy centers, and the crisp white chocolate were a little bit of celebration in each bite. Every Easter since, these eggs have become a small tradition.
I vividly recall a rainy April afternoon when my cousins came over, and we ended up forming an impromptu assembly line for dipping and decorating these peanut butter eggs. Laughter filled the kitchen as sprinkles landed everywhere except on the eggs, and even my youngest cousin managed to sneak a taste of the chocolate. The best part was how each egg came out a little different, each one a reflection of the hands that shaped it. Sharing these treats felt like sharing a piece of that joyful moment. Some eggs were gifted, while the rest disappeared before dinner.
Ingredients
- Creamy Peanut Butter: Smooth texture makes for silky centers, but choose a brand that stays thick and doesn& separate.
- Unsalted Butter: Softened to blend effortlessly; colder butter makes the mixing slower and messier.
- Powdered Sugar: Important for structure—add slowly to avoid clumps and achieve the perfect consistency.
- Vanilla Extract: A dash warms the flavor and brings out the sweetness of the peanut butter.
- Pinch of Salt: Balances the sugar and enhances the creamy depth—don& skip this tiny but mighty addition.
- White Chocolate Chips or Melting Wafers: Choose good quality; melting wafers create a smoother, more professional coating.
- Coconut Oil (optional): Use for a shinier finish and easier dipping—too much, though, makes the coating soft.
- Colorful Sprinkles: Adds personality and festive flair; pastel sprinkles are ideal for Easter, but anything goes.
Tired of Takeout? 🥡
Get 10 meals you can make faster than delivery arrives. Seriously.
One email. No spam. Unsubscribe anytime.
Instructions
- Mix Your Filling:
- Grab your biggest bowl and electric mixer, then blend peanut butter, butter, vanilla, and salt until the mixture is creamy and inviting. Listen for the soft whir as everything comes together—you& know it& ready when the dough looks smooth and glossy.
- Add Powdered Sugar:
- Slowly sprinkle in powdered sugar, mixing between additions. The dough will go from sticky to pliable and thick, perfect for shaping without sticking to your hands.
- Shape the Eggs:
- With a tablespoon, scoop out portions and roll them into egg shapes, laying them gently on parchment-lined sheets. Some may look rustic, but that& part of their charm.
- Chill to Firm:
- Slide the tray into the fridge and let them set for half an hour while you melt chocolate or tidy up—this helps the eggs hold their shape when dipped.
- Melt White Chocolate:
- In a microwave-safe bowl, heat white chocolate and coconut oil in 30-second bursts, stirring each time. The chocolate should flow smoothly and coat a spoon without graininess.
- Dip and Decorate:
- Use a fork or dipping tool to coat each egg in melted chocolate, then rest them on parchment. Sprinkle generously while the coating is still soft so the colors stick.
- Set the Chocolate:
- Pop the tray back in the refrigerator for 10 minutes to let the chocolate harden and lock in the flavor. Resist peeking—they& less likely to smudge if left alone.
- Store for Freshness:
- Keep your finished eggs in an airtight container in the fridge until ready to serve; this keeps the white chocolate crisp and the centers tender.
 Pin it
 One particular year, I placed a plate of these eggs out for afternoon coffee with friends, and they turned into conversation starters—the sprinkles seemed to spark childhood stories at the table. Everyone agreed they tasted as cheerful as they looked. Suddenly the eggs weren& just dessert but a centerpiece for laughter and new memories. These treats have a way of inviting people in, even after the holiday.
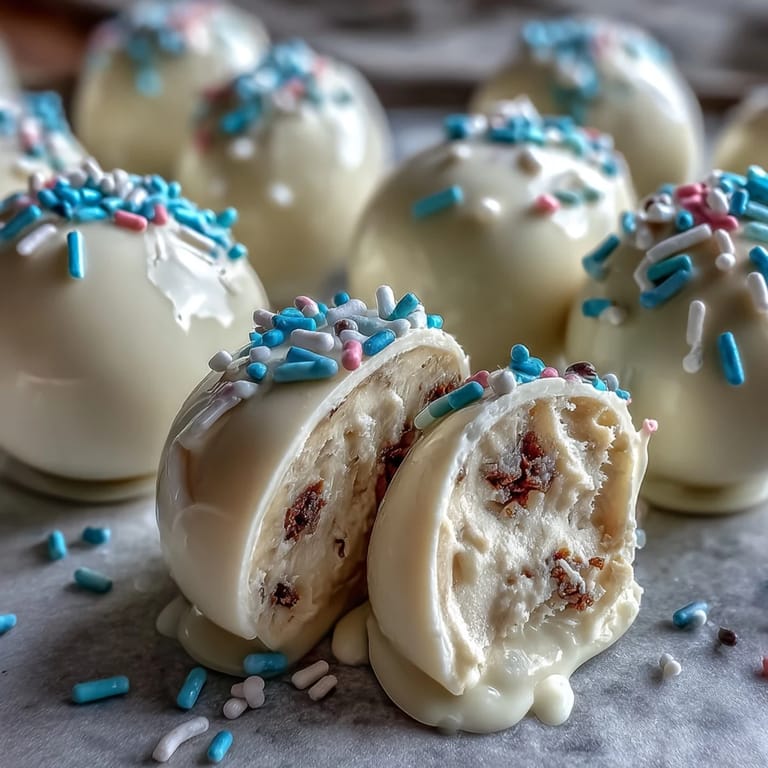
Sprinkles: Bringing Color and Personality
It always amazed me how a quick handful of sprinkles could transform plain white chocolate into something joyful and inviting. I learned to let kids sprinkle their own, even if it bordered on chaos, because each egg gained a look that matched the maker. Pastel, neon, or classic gold—they all tell a little story and spark smiles around the kitchen table.
Choosing the Best Chocolate for Dipping
Melting white chocolate takes patience, and over the years I found that using melting wafers minimizes frustration and prevents those pesky lumps. Whenever I tried shortcuts, it resulted in thick, uneven coatings—so now I only use the real stuff. Coconut oil is optional, but I use it to achieve a glossy finish and smoother dipping experience.
Easter Egg Assembly Tips and Tricks
Shaping the eggs is inevitably a little messy, but I discovered that lightly dusting your hands with powdered sugar stops the dough from sticking. The assembly line helps, especially with little helpers, and keeping the eggs chilled makes everything easier. Decorating immediately after dipping is key, or the sprinkles will just roll off.
- Have a spare tray ready for decorated eggs to set quickly.
- Wipe dipping tools between uses for a cleaner finish.
- Don& skip chilling—even a few minutes makes the difference!
 Pin it
 Sharing these white chocolate peanut butter eggs always brings a little extra brightness to my spring table. Make them once, and you& see—every batch comes with its own happy little kitchen story.
Recipe FAQ
- → How do I achieve a smooth white chocolate coating?
Melt white chocolate chips with coconut oil for a smoother, glossier finish. Stir well after each heating interval.
- → Can I use other types of chocolate for coating?
Yes, dark or milk chocolate can be substituted for the white chocolate for a richer flavor variation.
- → How can I make the peanut butter filling crunchier?
Add chopped roasted peanuts to the filling for extra texture and a nutty boost.
- → How long do these treats stay fresh?
Stored in an airtight container in the refrigerator, they remain fresh for up to one week.
- → Are these suitable for vegetarians?
Yes, the ingredients are vegetarian-friendly, using dairy and peanut products.
- → What tools are needed for preparation?
You will need mixing bowls, an electric mixer, baking sheet, parchment paper, and a microwave-safe bowl.