Pin it
 My neighbor showed up at my apartment one afternoon with a box of mini cheesecakes she'd made, and honestly, I was skeptical about the whole bite-sized dessert thing until I tasted one. The way the buttery graham cracker crust cracked under my teeth, followed by that impossibly creamy center, changed my mind completely. Now whenever I host even the smallest gathering, these little cakes are what people ask for first. They're deceptively simple to make, which means you can pull them off even when you're already stressed about hosting. There's something about sliding a homemade dessert onto a plate that makes any moment feel special.
I made these for the first time when my best friend moved into her new place, and I remember standing in her kitchen watching her face light up when she bit into one. We ended up eating half the batch before her other guests arrived, laughing about how we kept saying just one more. That moment sealed it for me—these cheesecakes weren't just dessert, they were a way to celebrate something good happening to someone I cared about.
Ingredients
- Graham cracker crumbs: The foundation of everything, and the key is not grinding them too fine or they'll turn to dust when you mix them with butter.
- Granulated sugar: Split between the crust and filling, it keeps things balanced so neither part overshadows the other.
- Unsalted butter, melted: This binds the crust together and keeps it crispy, never use cold butter or you'll end up with a sandy texture.
- Cream cheese, softened: Room temperature is non-negotiable here because lumpy cheesecake filling is genuinely heartbreaking.
- Sour cream: The secret ingredient that keeps these from being too heavy and adds a subtle tang that balances the sweetness.
- Eggs: They set the structure, so add them slowly and don't overmix or you'll trap too much air.
- Vanilla extract: Use the real stuff if you can, it makes a noticeable difference in how the flavor comes through.
- All-purpose flour: Just a tablespoon prevents cracking and helps the filling stay silky, so don't skip it.
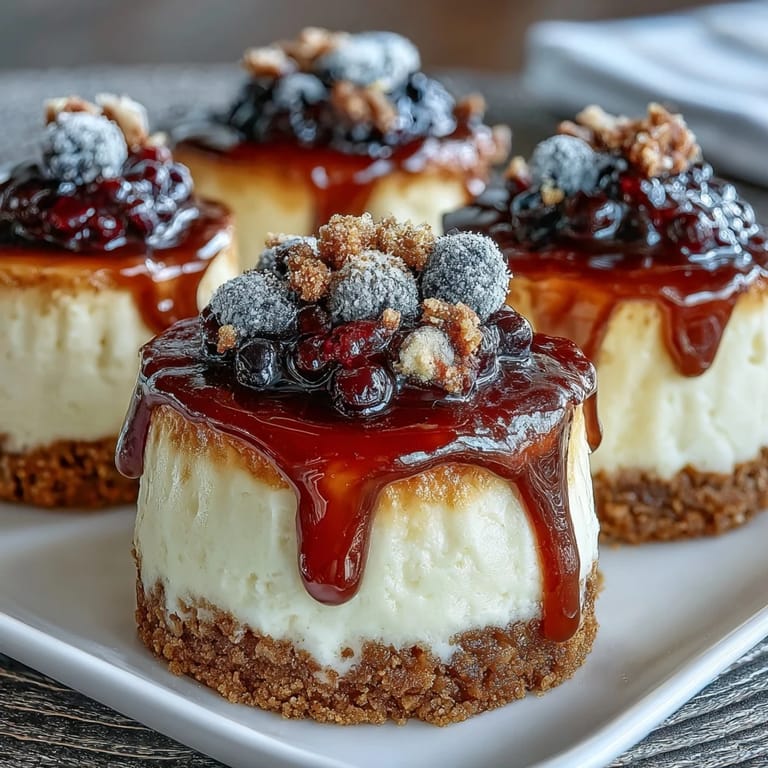
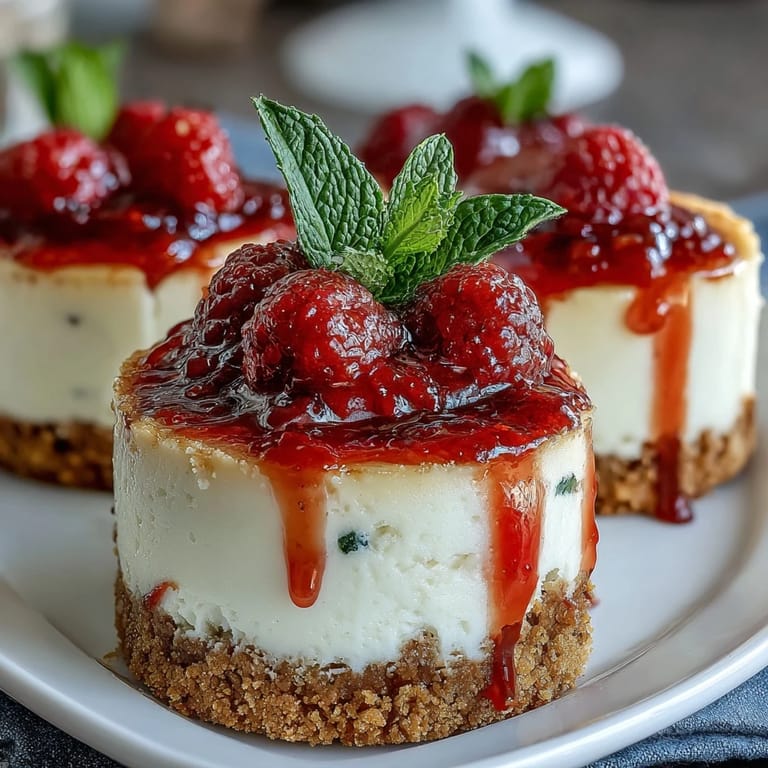
- Optional toppings: Fresh berries, preserves, whipped cream, or chocolate shavings let you customize each batch to match the occasion.
Tired of Takeout? 🥡
Get 10 meals you can make faster than delivery arrives. Seriously.
One email. No spam. Unsubscribe anytime.
Instructions
- Prep your pan:
- Heat your oven to 325°F and line those tiny muffin cups with paper liners, which makes removal so much easier and keeps cleanup minimal. If you skip the liners, you'll spend twenty minutes wrestling with sticky cheesecakes.
- Build the crust:
- Combine graham cracker crumbs, sugar, and melted butter in a bowl until it resembles wet sand, then divide it among the liners using about a heaping teaspoon per cup. Press down gently but firmly so it holds together when you bite into it later.
- Cream the cheese:
- Beat softened cream cheese until smooth and there's not a single lump visible, which takes a minute or two of patient mixing. This step matters more than you'd think because lumps never fully disappear during baking.
- Build the filling:
- Add sugar to the cream cheese and mix until creamy, then incorporate eggs one at a time, waiting a few seconds between each addition. After that, add sour cream, vanilla, flour, and salt, mixing just until everything is combined and no longer streaky.
- Fill and bake:
- Spoon the filling over each crust until it almost reaches the top of the liner, then slide the pan into your preheated oven for 18 to 20 minutes. The centers should look barely set with just a tiny jiggle in the middle when you give the pan a gentle shake.
- Cool gradually:
- Let them sit in the hot pan for 15 minutes so they firm up slightly, then transfer them to a wire rack to cool completely. This gradual cooling prevents cracks from thermal shock.
- Chill and serve:
- Pop them in the refrigerator for at least an hour, though overnight is even better if you have time. Add your toppings just before serving so they stay fresh and vibrant.
 Pin it
 There's a moment after you pull these from the oven when your kitchen fills with this warm, sweet, slightly tangy smell that makes you feel like you're actually good at this whole cooking thing. I'll never forget my mom trying one straight from the refrigerator and saying it reminded her of a fancy dessert she'd had at some restaurant, except better because I made it in my tiny kitchen with no fancy equipment. That's when these stopped being just a recipe and became proof that sometimes simple ingredients and a little patience can create something truly memorable.
Why These Work for Any Occasion
The magic of mini cheesecakes is that they're small enough to feel indulgent without being heavy, so people can eat one or two without feeling guilty or stuffed. They're equally at home on a casual dessert table with brownies and cookies or dressed up as the star of a sophisticated dinner party. I've served them at everything from a coworker's birthday gathering to an anniversary celebration, and they've never let me down or made me feel like I was taking a shortcut.
Timing and Make-Ahead Strategy
These cheesecakes actually get better after a night in the refrigerator because the flavors settle and the texture becomes perfectly creamy, so there's real value in making them a day ahead. If you're planning to host, you can make the whole batch minus the toppings the day before, then simply add berries, chocolate, or whipped cream right before people arrive. This takes so much pressure off your day and means you're not stressed in the kitchen while trying to enjoy time with guests.
Customization and Flavor Variations
Once you nail the basic recipe, you can start experimenting with flavors that match your personality or the occasion. Lemon zest brightens everything up, a drizzle of salted caramel takes them fancy, and crushed cookies mixed into the topping keeps things playful. These little adaptations make the recipe feel like yours instead of just something you're following:
- Swap the vanilla for almond extract or add citrus zest to the filling for subtle flavor shifts that feel intentional.
- Layer different preserves or sauces on top depending on what's in your pantry or what matches your party theme.
- Keep them plain and simple if that's your style, because sometimes the most elegant dessert is the one that tastes like pure cheesecake.
 Pin it
 These mini cheesecakes have become my go-to for any moment that deserves a little extra sweetness, whether that's a housewarming, a celebration, or just Tuesday. There's something deeply satisfying about watching people's faces light up when they realize these little bites of heaven came from your own kitchen.
Recipe FAQ
- → How long should the mini cheesecakes chill?
Chill the cheesecakes for at least 1 hour to allow the filling to set and develop creamy texture.
- → Can I make a gluten-free version?
Yes, substitute gluten-free graham crackers and flour for safe, gluten-free crust and filling.
- → What toppings work best with these cheesecakes?
Fresh berries, fruit preserves, whipped cream, or chocolate shavings enhance flavor and presentation.
- → How do I prevent cracking on the cheesecakes?
Mix ingredients gently to avoid overbeating and bake until centers are just set but slightly jiggly.
- → Can these be prepared in advance?
Absolutely, they can be made a day ahead and kept refrigerated to simplify serving.